Hello world 👋 my name is Francisco, fcoterroba on the Internet and today I bring you a post in which I am going to talk about forms and PHP
Some pretty bad developer jokes could come from here, but we're going to refrain from doing so (Explaination for NON-Techs: PHP is considered one of the most hated programming languages although, if I can be honest, I don't understand why). 🤣
Seriously, in this post, very quick and easy, we are going to learn what forms are, how to do them correctly, where to point them, how to add a captcha so that our tray doesn't fill up with robots 🤖.
And yes, we will also learn how to make them pretty using some of the most famous CSS frameworks 🎨. I have to emphasize this part since I know first-hand that the majority of back-end developers suffer in this part. 🤣
And, unlike using different CMS such as WordPress, once we have the design of our page (whether it is a template, ordering it or designing it), we will only have to worry about knowing how to configure a form and server plugin correctly. The design goes for another account 🚶♂️.
Before starting, although later I will explain what it is, I will I recommend visiting a post that I uploaded more than a month ago, in which I explain many of the most used computer terms in our day to day. Since, in this post, you will see words that you probably do not sound a lot. 🤯 You can reed the post here.
I also want to remind you that a few months ago I uploaded a video to my YouTube channel, very interesting, focused on home automation. Specifically, we connect, configure and install a smart light bulb 💡 with which you can change its color, turn it off, turn it on and much more simply by using your mobile phone and/or voice assistants such as Google, Alexa, etc. 👇🏻
PREVIOUS STEPS:
Before starting to understand what a form is, how to apply designs to it and much more, you should know that PHP is not just another language.
PHP is a language that runs on the server, unlike JavaScript which runs on the client.
That PHP is a server language means that it cannot be executed until you have a specific program. These programs are known as servers.
I talked about servers a while ago and, in order not to fill out the post so much, I recommend that before continuing, if you don't already have it installed, you read the post and install it. Doing their respective tests. You can reed the post here 👈
WHAT IS A FORM?
Although I explained it in the WordPress post, it never hurts to explain it again:
A form is a document (although in our world it is digital) that mainly serves as a link between clients and companies, or rather between users and developers.
Specifically, I (and probably 100% of the pages you visit) have a section on the website that is exclusively that, a page with a contact form. Test it if you want!
It doesn't have much more history so, we start with the PHP part👇
DESIGN AND REALIZATION OF THE FORM WITHOUT CAPTCHA
En este mismo post van a meter mano tres lenguajes de «programación». Pongo las comillas ya que HTML y CSS, lenguajes que usaremos en este post, no se consideran como tal.
The steps to follow are as follows, but I recommend that you first read a post I made a while ago in which I taught how to make a button. dark-mode for your website. There I perfectly explain the beginning of this realization. You can reed the post here 👈
1. Make the HTML of the page (although it will have a PHP extension)
<!DOCTYPE html> <!--Etiqueta que sirve para explicar al navegador el tipo de documento-->
<html> <!--Etiqueta del comienzo del HTML -->
    <head> <!--Etiqueta del comienzo de la cabecera-->
        <title>Formularios en PHP | fcoterroba.com</title> <!--Etiqueta para ponerle título a la ventana-->
        <meta charset="UTF-8"></meta> <!--Etiqueta para establecer los caracteres permitidos-->
    </head> <!--Etiqueta del cierre de la cabecera-->
    <body> <!--Etiqueta del comienzo del cuerpo -->
        <h1>Hola mundo</h1><!--Etiqueta para escribir un encabezado de nivel 1-->
    </body> <!--Cierre del cuerpo-->
</html> <!--Fin del documento-->
2. Preparation of the form
<!DOCTYPE html>
<html>
    <head>
        <title>Formularios en PHP | fcoterroba.com</title>
        <meta charset="UTF-8"></meta>
    </head>
    <body>
<!--Etiqueta para indicar comienzo de formulario | Con action seleccionamos el fichero que aparecerá después del botón de enviar-->
<!--El method post es para que no aparezca lo que escribimos en la barra de búsqueda-->
<!--Con el id le damos un identificador en forma de nombre al formulario-->
        <form action="index.php" method="post" id="formulario">
            <label for="name">Nombre: <!--El label sirve para identificar cada input siempre y cuando tengan el mismo for/id-->
                <input type="text" id="name"> <!--Entrada de tipo texto-->
            </label><!--Cierre del label-->
            <br><br><!--Saltos de línea-->
            <label for="subname">Apellidos:
                <input type="text" id="subname">
            </label>
            <br><br>
            <label for="mail">Email:
                <input type="email" id="mail"><!--Entrada de tipo email-->
            </label>
            <br><br>
            <label for="asunto">Asunto:
                <input type="text" id="asunto">
            </label>
        </form><!--Fin del formulario-->
        <br>
        <label for="msg">Escribe tu mensaje...</label>
        <br>
        <textarea id="msg" form="formulario"></textarea><!--Entrada de tipo textarea, para escrituras largas y grandes-->
      	<br>
        <input type="submit" form="formulario"></input> <!--Entrada para establecer un botón de finalizar-->
    </body>
</html>
3. Form design
We are going to use a CodePen.io that I have seen from David Fitas with a pretty cool vintage touch. If you copy and paste directly to the style.css it does not look exactly the same but it gives it the necessary air to continue.
And with this we would have finished creating the form. 🤓
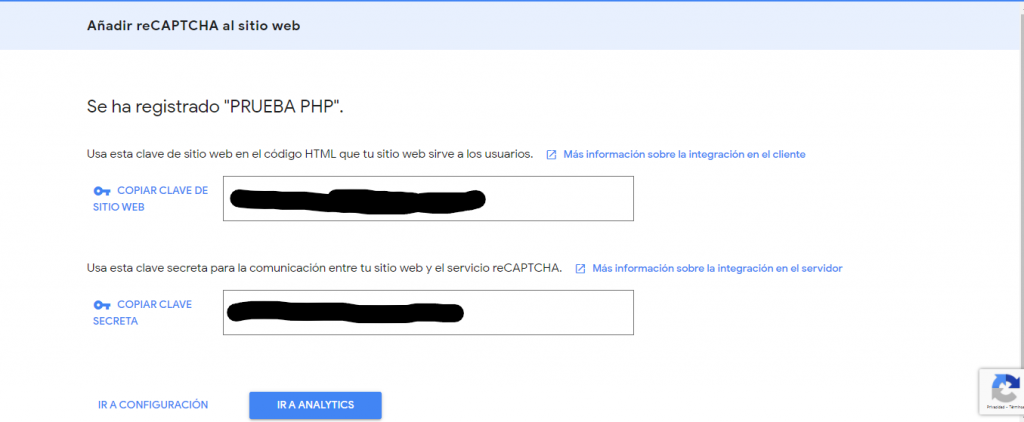
ADD CAPTCHA
To add the captcha it is as simple as adding the following line of code where we want to make the Captcha appear.
Obviously, we will have to replace your_site_key for the public API KEY Google provide us.
<div class="g-recaptcha" data-sitekey="your_site_key"></div>
And that would be all for today, guys. 🖖
And guys, the farewell has arrived, that's all for today! I hope you liked it and it has been of great use to you! 🤓 See you here very soon and you already know that you can follow me on Twitter, Facebook, Instagram and LinkedIn. 🤟🏻