Hello world, my name is Francisco, fcoterroba on the Internet and today I bring you an explanatory post to create a web server in Windows.
There are a multitude of reasons why we want to have a web server on our computer, from starting to study web development, setting up a CMS, sharing multimedia, etc.
Before starting, I note that this guide is used to set up a local web server, which you can access from any device connected to the same network as the server. If you want to learn how to open it to the public, let me know in the comments!
Mainly, in Windows there are two options.
Una de ellas viene «nativa» en el propio sistema operativo. Usa servidor privativo (Microsoft-IIS) y es muy sencilla, para practicar HTML, CSS y JS principalmente. Puedes añadir a posteriori lenguajes de programación back-end como PHP o MySQL, pero no vienen por defecto.
The other option is somewhat closer to the professional field, since it uses the Apache system, present in almost 40% of world servers. We are talking about WAMP (Web Apache MySQL PHP Acronym). I'll go into more detail about WAMP later. Now, let's get to the nougat.
MOUNT WEB SERVER WITH MICROSOFT-IIS
Microsoft-IIS is a set of services part of the Windows operating system.
In addition to setting up a web server, it allows the configuration of an FTP server (I will talk about it in another post)
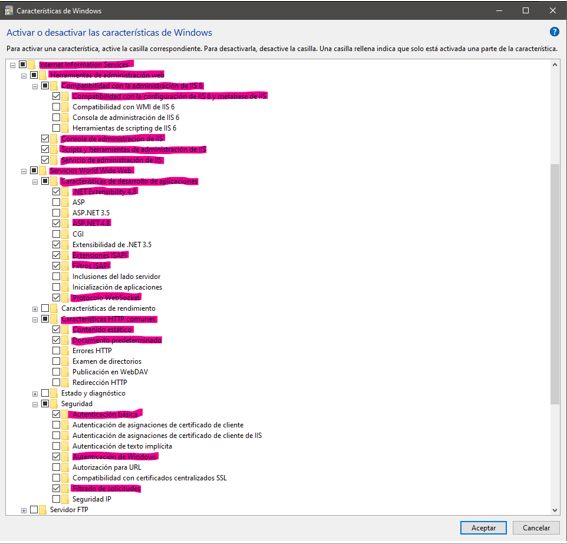
Para activar esta característica, deberemos escribir «características» en la barra de búsqueda y nos aparecerá una ventana cuadrada con las características que tenemos activadas en Windows.
Las características son «pequeñas funcionalidades» que, aunque pueden ser instaladas y configuradas, no vienen de serie con el sistema operativo.
La característica que debemos inicializar para tener un servidor web en Windows es principalmente «Internet Information Services > Servicios World Wide Web». Instalando solo esa ya funcionaría, pero podéis también instalar la de arriba, Herramientas de Administración Web para ver la consola de la web. Aunque para nuestro fin, no es necesario. En concreto, las necesarias son las marcadas de la imagen
Once we activate those, we click on the accept button and it will take a few minutes to activate. (Maybe it also asks for a restart)
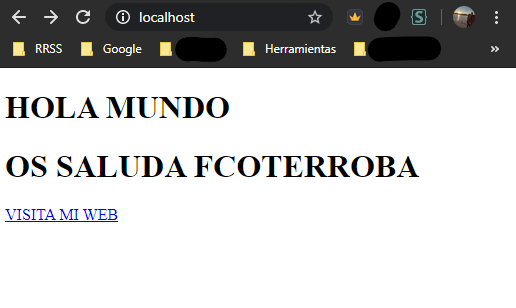
Y con esto ya tendríamos un servidor web hecho. Podremos comprobarlo escribiendo «localhost» en nuestro navegador.
As you can see, a web page appears with a photo of Windows and the welcome in several languages.
But you probably weren't looking to create a web server to have this, so I'm going to explain how to change that page.
To replace this web page with the page you want, you first need to create the file.
No voy a explicar todo HTML, pero lo necesario para escribir «Hola Mundo» es (ignora todo lo escrito entre <!—-> porque son comentarios para explicarte qué funcionamiento tiene):
<!DOCTYPE html> <!--Declara el tipo de archivo-->
<html lang="es" dir="ltr"> <!—Declara el lenguaje de la página y la direccionalidad del texto-->
  <head> <!—Comienza la cabecera, todo aquello que no se ve-->
    <meta charset="utf-8"> <!—Establece los caracteres usables-->
    <title>fcoterroba en un servidor Microsoft</title> <!—Es el título de la página, lo que aparece en la pestaña-->
  </head> <!--Cierre de la cabecera-->
  <body> <!—Comienzo del cuerpo del archivo, todo lo que se ve en la página-->
    <h1>HOLA MUNDO</h1> <!—H seguido de un número del 1 al 6 declara el tipo de encabezado-->
    <h1>OS SALUDA FCOTERROBA</h1>
    <a href="www.fcoterroba.com">VISITA MI WEB</a> <!--A es un enlace y href el atributo para indicar hacia dónde ir-->
  </body> <!--Cierre del cuerpo-->
</html> <!--Cierre del documento-->
Copiáis y pegáis eso en vuestro bloc de notas o editor de código favorito, lo renombráis como index.html y lo subís a la carpeta del servidor, que por defecto es: «C:\inetpub\wwwroot»
Now, if you reload localhost, the text will appear.
SET UP WEB SERVER WITH WAMP
WAMP is a software stack for Windows that includes Apache (web server), MySQL (database), and PHP (web back-end language).
This means, put together, that from a single program it installs the three main technologies that any website has today and without going deep into configuration files.
To begin, we download the executable in the repository page and install it. (Careful, it weights more than medium GB)
When the program is installed, an icon will be created on your desktop. The best thing to do would be to restart it to make it finish taking the changes, but it is not strictly necessary.
When we open the program, an icon will have been created next to the clock in the taskbar. If it is green, the server is working perfectly.
We will type localhost again in the browser to check how it works and we will also press the phpinfo() link to check that it is also installed.

To change this home page we modify the server index, which by default is installed at C:\wamp64\www
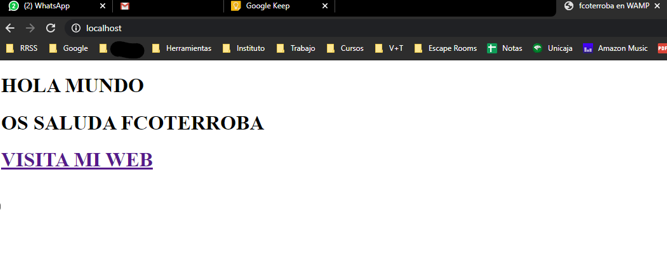
We delete all the existing content inside and replace it with what we have already found. We save the changes, update the browser and voilà.
And this has been all guys, I hope you found it interesting, leave me any doubts/ideas you have in the comments below.
Don't forget to follow me on Twitter, Facebook, Instagram and LinkedIn.
See you soon!