Hello world 👋🏻 my name is Francisco, fcoterroba on the internet and today I bring you a post focused on my world, the world of web development
This time I bring you a post in which I am going to talk, explain and demonstrate how and what a scrollbar indicator is. As well as the best WordPress to add to WordPress.
If after reading this you feel more eager to write code, you may want to go through the collection of posts with Python projects that exist on the web! Today you have How can we do a calculator in the terminal?, the project we did for generate QR codes. and the graphical exchange using an APIs and a lot more!
Before starting, although later I will explain what it is, I will I recommend visiting a post that I uploaded more than a month ago, in which I explain many of the most used computer terms in our day to day. Since, in this post, you will see words that you probably do not sound a lot. 🤯 You can reed the post here.
I also want to remind you that a few months ago I uploaded a video to my YouTube channel, very interesting, focused on home automation. Specifically, we connect, configure and install a smart light bulb 💡 with which you can change its color, turn it off, turn it on and much more simply by using your mobile phone and/or voice assistants such as Google, Alexa, etc. 👇🏻
Now yes, let's start!
What is an scrollbar??
Although it does not specifically refer to the following, a scrollbar is the scroll bar normally located to the right of all web pages and applications that show when you will reach the end of said web page.
According to Wikipedia and, as always, ambiguous description, The scroll bar is an object of the graphical user interface through which an internet page, an image, a text, etc., can be slid down. or above. The bar usually appears on the right of the screen, although it can also be configured to appear on the left.
WORDPRESS:
As I have already told you in some of my posts about WordPress. This tool is so powerful that there are countless plugins to get you to the point where you want to end up.
Sometimes, like this time, it is practically impossible to choose one when there can be, easily and without exaggeration, about 100 plugins that do exactly the same thing.
But, in summary, the three best WordPress plugins in terms of scrollbar are:
- Reading Position Indicator -> It seems minimalist but I don't know to what extent it could be poorly customizable or dry. That's why I decided NOT to install this one. ❌
- Read Meter -> With this plugin I had to examine it very closely since it was and seemed very good but it didn't really catch my attention, especially because it is the typical plugin that does many things but none of them completely well. It had a lot of mini things that ended up adding a lot to the plugin to do things as simple as this. That's why this one is also rejected. ❌
- Reading Progressbar -> Finally I decided to keep this one since it was the most minimalist. It fulfilled and fulfills its objective without overloading the plugin to the point of making it heavy. ✅
As I explained in previous posts, to install said plugin you simply have to write it in the existing plugin store in the WordPress dashboard.
Once installed and activated, we will go inside Ajustes > Reading Progressbar
Within these options we will configure it to our liking as we want:
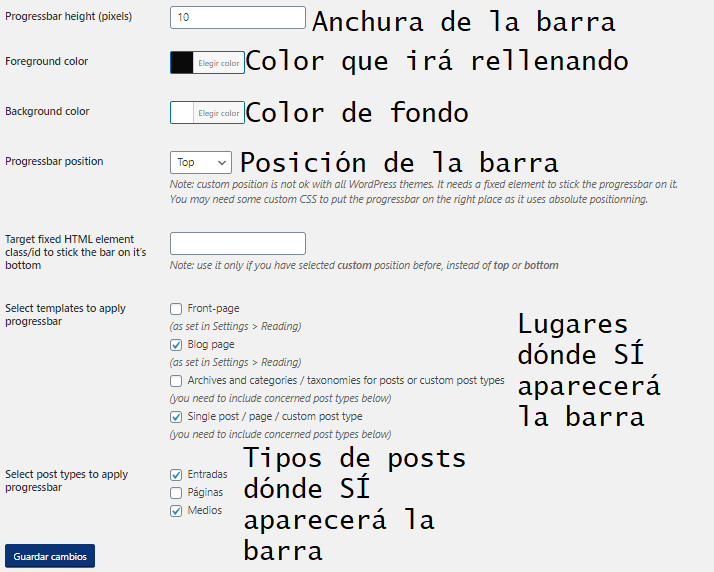
If you look up, you'll see how it looks with this configuration! 🤓👆🏻
CODE
If you are a pure developer or just have a website with bare code, this is for you.
Before we start, I leave you this gif so you can see how everything will turn out! 👇🏻

The HTML code is a basic one, with its header, linking the different styles and little else. Very simple. 😁
<!DOCTYPE html>
<html lang="es">
<head>
    <meta charset="UTF-8">
    <meta name="viewport" content="width=device-width, initial-scale=1.0">
    <title>FCOTERROBA.COM | ScrollBar indicador</title>
    <link href="https://fonts.googleapis.com/css2?family=Indie+Flower&family=Itim&display=swap" rel="stylesheet">
    <link rel="stylesheet" href="style.css">
    <script src="main.js"></script>
</head>
<body>
    <div class="line" id="scrollIndicator"></div>
    <h1>MIRA HACIA ARRIBA Y VERÁS EL SCROLLBAR INDICADOR A MEDIDA QUE VAS BAJANDO LA PANTALLA</h1>
    <hr>
    <p>Lorem ipsum dolor sit amet consectetur adipisicing elit. Aut blanditiis cupiditate in a odit? Voluptate, sed pariatur, ducimus minus autem deserunt inventore corrupti doloribus voluptatem at possimus! Libero, sequi perferendis. Lorem ipsum dolor sit amet consectetur adipisicing elit. Voluptas modi qui esse maxime. Mollitia expedita ea officiis enim veritatis harum illum blanditiis quo sint esse aliquam eos, illo vitae laudantium. Lorem ipsum dolor sit amet consectetur adipisicing elit. Temporibus aut dolor voluptas neque deserunt laborum quas dolorem eum provident expedita numquam asperiores inventore distinctio vitae exercitationem animi, iste suscipit quasi?. Lorem ipsum dolor sit amet consectetur adipisicing elit. Dolores incidunt quisquam expedita quae esse illo facere consectetur molestiae provident exercitationem aliquid nostrum aspernatur explicabo itaque labore, in aut alias dolorem. Lorem ipsum dolor sit amet consectetur adipisicing elit. Modi, quaerat tempora. Reiciendis recusandae officia, odit deserunt, quae ratione in modi, veniam sapiente iusto aspernatur et. Quam velit corporis aliquid sed? Lorem ipsum dolor sit amet consectetur adipisicing elit. Libero ut facilis et est repudiandae ullam modi quidem cupiditate dicta ducimus adipisci voluptatem nihil impedit, saepe animi laudantium! Nam, ad voluptate!</p>
As for the CSS, I simply added backgrounds, changed the typography and tweaked the margins.
*{
    text-align: center;
}
h1{
    font-family: 'Itim', cursive;
}
p{
    font-family: 'Indie Flower', cursive;
}
.line{
    background: black;
    height: 8px;
    border-radius: 4px;
    width: 0%;
    position: fixed;
    top: 0px;
    margin-left: 0px;
}
Lastly and most importantly, the script, which calculates and displays, according to the width of the screen, all packed into a simple function.
window.onscroll = function(){ myFunction(); };

function myFunction(){
  var winscroll = document.body.scrollTop || document.documentElement.scrollTop;
  console.log(winscroll);

  var height = document.documentElement.scrollHeight - document.documentElement.clientHeight;
  console.log(height);

  var scrolled = (winscroll/height) * 100;
  document.getElementById("scrollIndicator").style.width = scrolled + "%";
}
By copying (and editing as much as necessary) these three codes, you will be able to get a very beautiful scrollbar indicator with a simplicity, elegance and minimalism that has nothing to envy of other pages! 😁
And guys, the farewell has arrived, that's all for today! I hope you liked it and it has been of great use to you! 🤓 See you here very soon and you already know that you can follow me on Twitter, Facebook, Instagram and LinkedIn. 🤟🏻