
Hello world my name is Francisco, fcoterroba on the Internet and today I’m bringing you a post where we’re going to talk about Raspberry Pi. How to install an operating system, what packages to install as well as initial configuration and SSH configuration. To be able to access the raspi from any other device.
First of all, I wanted to thank my partner Nuria who has been the person who gave me the Raspberry. As well as to get me started in the field.
Hey hey, before starting, what is Raspberry Pi?
A raspberry pi, or raspi, as I call it. It’s a low-cost single-board computer developed by the Raspberry Pi Foundation with the aim of stimulating computer science teaching in schools.
Very roughly, and without looking at Wikipedia, a raspi is a mini-computer with which you can do basic functions. Although in its beginning it was thought for computing in schools, today there are endless raspis to do much more, such as: office automation, media center, Chromecast imitation, basic games, programming, etc.
Okay. What do I need?
The materials you need are: A power supply (although you must be careful not to burn it, checking the connector voltages, the mobile one usually works. As long as it’s micro-USB), an SD or microSD card, depending on the raspi model, an HDMI cable plus a device with that output, a way to connect to the network, regardless of ethernet cable or WiFi connection and a raspberry, obviously.

I’ve got everything. Where do I start?
The first thing you should do is select the operating system you want to install on the raspi. Although you can install almost any Linux distribution, the foundation’s ‘Downloads’ section, mainly recommends two operating systems.

Once we enter the distribution we end up choosing, several versions of the system will appear (for online or offline installations, images without GUI, etc.)
In our case we’re going to choose the NOOBS version. With which, unlike the Lite version, we’ll be able to perform both online and offline installation. We choose to download it via Torrent or zip, it’s the same. Once the file is downloaded, we’ll have a compressed file with .zip extension.
We’re going to unzip that file so that we end up with a set of more than 20 files.
Next, we’re going to proceed to connect the SD or micro SD card to the computer. There’s no general rule that forces computers to have or not have connectors for SD cards and derivatives. Simply, if you’re lucky enough to have a computer that has it, congratulations.
Otherwise, I recommend you buy a micro SD and SD adapter to USB, micro USB and type C. It doesn’t cost more than 9€ on Amazon
Once you have the card connected, format it in FAT32 (using Windows native tool or GParted on Linux)
And, finally, copy all the content extracted from the ZIP (except the compressed file itself and the text file with instructions) into the card.

I already have my SD card ready. Now what?
Well, now, what’s next, is to install the Operating System.
For this you must insert the SD or micro SD card into the raspberry, connect it to a monitor or television via HDMI cable, connect it to the network and finally plug in the power cable.
When it turns on and, after a few seconds of loading, an operating system selector will appear.
The downloaded distribution comes preinstalled with two systems:
- LibreELEC → Which is, a kind of operating system oriented to Kodi, a system to make a media center.
- Raspbian Full → Pure Linux distribution, based on Debian. For this tutorial, we select this one with the checkbox on the left and then we’ll click install.

Once it’s installed (takes around half an hour, depending on various factors), the device will restart to make the final changes and we’ll arrive at the desktop where an assistant will appear to configure our country, time zone and set a password.
Okay, so, I already have the operating system. Now what?
Now you have a fully functional raspberry.
What I recommend is that you start browsing among the packages that can be installed on Raspberry. I’m going to recommend nine to you, but I encourage you to keep searching:
-
The first on the list, for me essential is VLC. Although in the latest versions of Raspbian, this usually comes. Whether you’re going to use the raspi as a media center or not, VLC is possibly the best multimedia player existing on Linux (as well as Windows and MAC). It allows practically all video, audio formats, etc. In addition to being able to convert those files.
-
Like the previous one, in the latest versions it’s also usually installed, but, if not, I recommend installing Chromium as the default browser.
-
I also recommend the Nautilus file manager, this can be installed using the command:
sudo apt install nautilus
- Whether you’re going to use the terminal or not, it will be much more comfortable if you use Terminator.
sudo apt install terminator
- We’ll probably also download some Torrent. For this, the most recommended is Transmission
sudo apt install transmission
- It’s not Photoshop, not even close, but it can save us more than once to edit your photos from Summer 95. Gimp, the best free photo editor
sudo apt install gimp
-
You can also download, although it’s not very light, the best text editor in my opinion. Atom
-
If you’re going to program in some language (PHP, Java, Python, Javascript) you should start considering using an IDE. I recommend Eclipse
-
To capture the screen we can simply press the “Print Screen” key and enter the images folder. But if we want something more, we should use Shutter
sudo apt install shutter
Is this all?
Finally, what I personally advise all people who tell me they have a raspberry, is to configure their SSH server with a password and changing the default port. In addition to disabling the root user and creating one exclusively for that purpose.
SSH stands for Secure Shell. It’s the name of a protocol whose main function is remote terminal access. Roughly, activating and configuring SSH will allow us to access raspi from the mobile, for example, to start a process or consult a file.
For this, the first thing we must do is type in our terminal
sudo raspi-config > Interfacing options > SSH
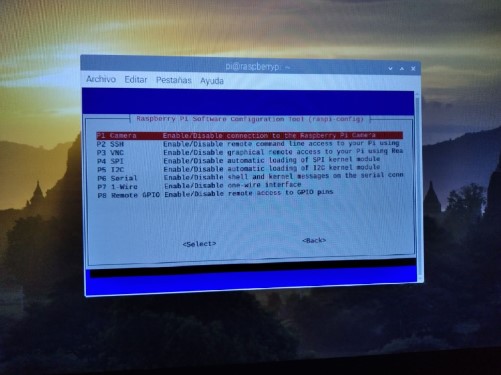
An assistant will then appear asking if we’re sure about activating the SSH protocol. We’ll click yes and finish.
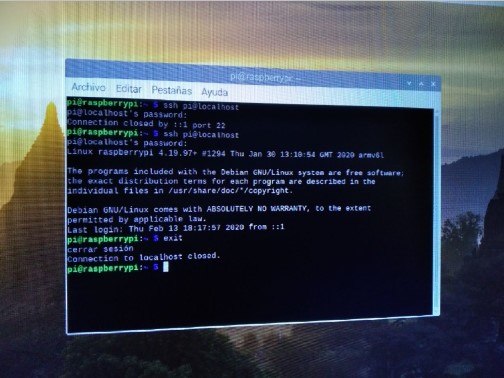
To check that SSH has worked, we use the command
ssh pi@localhost
Then, it will ask us for the password and with this we’ll have finished.
If you’re interested in a guide to make a media center, a personal cloud or any other idea using Raspberry, let me know in the comments or use the contact section.
Don’t forget to follow me on Twitter, Facebook, Instagram and LinkedIn and see you next time!
